Tuesday, March 30, 2010

Nebraska MCC Sale

The 2010 Nebraska MCC Sale is in the books.

For those who don't know what the MCC Sale is, it is an annual auction for the Mennonite Central Committee in Nebraska.  This two day event has food, quilts, crafts, and much more for auction and for sale. 
This year $168,773.85 was raised for MCC. 
Over the past 31 years, the Nebraska MCC Sale has raised $4,059,746.82 for MCC, which is pretty amazing if you ask me. 

This sale is not a place to find a deal. Since the money is going to a good cause, the bidders will go very high for small objects like a bowl of ice cream, an afghan for haiti or two dozen verenika. 

I was able to check one item of my list during this years sale.

I had the chance to bid and purchased an item for the first time at this sale. I should say items because I did bid on and purchase more than one item, more on that in a bit. 

Bidding at an auction is intimidating for me. I worry that the ring men won't see that I want to bid and I'm also worried that I won't be able to understand the auctioneer, so I will end up paying too much for something. Luckily, Kelly Kliewer was the auctioneer for the particular items I was interested in, so I didn't have any problem understanding him.   

 Unfortunately the lighting wasn't great, so it is kind of hard to see the pictures, but Kelly is the auctioneer in the blue. 
Brian, my parents neighbor, was the ring man on my side of the room and I had no problem getting his attention. Like a good ring man, Brian encouraged me to keep bidding. 

Here are my purchases. 

A brown Polka dot apron, for me to wear while I'm making Mennonite Monday recipes.  This was the first item I bid on and I was determined to get it and so was the other bidder.  I ended up paying $90 for the apron, since I didn't have plan on how high I wanted to bid, which is something I will remember in the future. However, the money is going to a good cause, so the price didn't bother me so much. 
A bottle of Maple Syrup. We paid $250 for that bottle. I know its crazy.  However it was a steal, considering the bottle of syrup that sold before this one went for $500.  I was very nervous about bidding this high for syrup, but Mike encouraged me from across the room so I kept bidding. 
The final item I bought was a picnic basket, with plastic cups, plates, bowls, cloth napkins and a few serving plates. The guys will be eating in style in the field this year for harvest. I had a plan for bidding on this item.  I had decided that I would pay $50 for the picnic basket, which is all the higher I had to go. 


After all of that bidding, it was time to hit the verenika meal.

After my first bidding experience, I feel like bidding on items can be addictive. After a while you start to think, "Oh I could bid on that," which could get you into some trouble. However, it was really fun to take part in the auction and I'm excited to do it again. 

Sunday, March 28, 2010

Don't Be Mad

I'm sorry to report that I wasn't able to make the Hobo Dinner for Mennonite Monday this week.  I would like to have some really good excuse, but the truth is, we were busy.  Mike and I didn't eat at home much this week with the Nebraska MCC Sale and Easter gatherings, so I had no reason to make a meal.  

However, I will give you something to look forward too. 

On Wednesday I will have a post about a item I crossed of my bucket list. You don't want to miss that. 

and

Friday I will post a special invitation, so you also don't want to miss that. 

Now I am going to watch the second half of the Nebraska womens basketball game. 

GO BIG RED!

Monday, March 22, 2010

Mennonite Monday - Homemade Ice Cream

Mennonite Monday started because I wanted to make recipes from the Bethesda Mennonite Church Cookbooks (both the yellow and the white cookbook for those of you who own them). I also wanted to take pictures of each recipe that I made, so I would know for future reference what the recipe should look like. I am by no means a great cook, but I think it will be fun to try new and different recipes each week. Not all of these recipes are for ethnic Mennonite food, but the women from Henderson know how to cook, so I can safely say that these recipes will be good. Check back each Monday for a new recipe and feel free to leave a comment if you have a favorite recipe from these cookbooks, or if you have some tips on what I should make and how I should make it.
~

Last week while I was waiting for my Zwieback to rise, I thought it would be a good time to use our ice cream maker for the first time. We received an ice cream maker for a wedding gift and haven't used it in 2 years.  I decided to go with Beverly Friesen's recipe for homemade ice cream on page 110 of the white church cookbook.
Homemade Ice Cream 
2 small pkg instant vanilla pudding
2 cups whipping cream
2 cups Half and Half
6 eggs
2 cups sugar
1/2 tsp salt
2 Tbl vanilla
3-4 cups milk 

Beat pudding with cream and Half and Half on slow speed, gradually add eggs one at a time. Add sugar, salt and vanilla.  Pour mixture into ice cream freezer and add milk to fill line.  Makes 5 quarts. 

 The great thing about this recipe is the fact that you can buy your whipping cream and half and half in one pint containers (roughly 2 cups), so there isn't any left over cream. 

Mixing everything together. Looking back now, I wish I would have used the whisk attachment on my mixer because my pudding made some lumps in my ice cream because it wasn't mixed until it was completely smooth.

In the ice cream maker.

Mixing


YUM!

Monday, March 15, 2010

Mennonite Monday - Zwieback

Mennonite Monday started because I wanted to make recipes from the Bethesda Mennonite Church Cookbooks (both the yellow and the white cookbook for those of you who own them). I also wanted to take pictures of each recipe that I made, so I would know for future reference what the recipe should look like. I am by no means a great cook, but I think it will be fun to try new and different recipes each week. Not all of these recipes are for ethnic Mennonite food, but the women from Henderson know how to cook, so I can safely say that these recipes will be good. Check back each Monday for a new recipe and feel free to leave a comment if you have a favorite recipe from these cookbooks, or if you have some tips on what I should make and how I should make it.
~
This week Mike encouraged me to tackle my first attempt at Zwieback, the first item on my bucket list. Luckily I didn't have a full schedule on Saturday, so I was able to take on the challenge and I'm pleasantly surprised with how well it went for my first attempt.  
For those that don't know, Zwieback, also known as Two Bakes, is a Mennonite bread.  It is different from regular dinner rolls because it is a sweater bread and it has a certain smell and taste if you make them right.

I referenced three different cookbooks while making the Zwieback.  I referenced the white church cookbook and the red Henderson Homemakers Club Cookbook, but ultimately used a recipe from the yellow cookbook on page 9.  
Zwieback
2 cups margarine (melted)
4 cups milked (warmed)
2 cups water
5 pkgs or 10 teaspoons dry yeast
1/2 cup sugar
2 tablespoons salt
about 16 cups flour

Combine margarine, milk, water, salt, sugar and yeast, then slowly add flour, about 3 cups at a time.  Stir until smooth after each addition, until stiff enough to knead by hand.  Let rise until double in bulk. Then form into walnut size balls and place one on top of another on a cookie sheet.  Let rise until double in size and bake in a 400 degree oven for 15 to 20 minutes. 

(1 recipe suggests using 1/2 cup oleo and 1 cup lard and crisco mixed in place of the 2 cups margarine.)


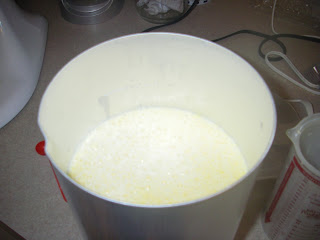
The white stuff in the tub is lard. I had lard from butchering in February, so I was pretty excited to use it, but I had a little miss understanding in my substitution for the margarine. For some reason I though oleo was crisco. For those of you that know what oleo is, you are probably laughing and for those of you that don't, let me tell you that oleo is margarine.  With that said, using 1/2 cup lard and 1 1/2 cups crisco, worked fine.  I am going to do it the right way next time, so it will be interesting to see how different the Zwieback turn out.

I mixed all of the crisco and lard first with a little milk, while the yeast was in the warm water activating.

The mixture of the lard and crisco looked creamy and at this point I added all of the other ingredients except the flour. 

Once these ingredients were added the crisco became a little lumpy again, but I figured it would smooth out as I added the flour. 
After the first three cups of flour. 
  Second set of 3 cups of flour
Third set of 3 cups of flour
Fourth set of 2 cups of flour. At this point I put on the dough mixing hook and the shield because the mixer was very full. 
Final 2 cups of flour. You can see that the dough completely filled the mixer. 
This is how much dough there was before it started to rise.

Since we haven't had sunshine in a long time, I had to set the dough in front of a heater by the window in our living room to get the dough to rise. 
After the dough has risen for about an hour. 

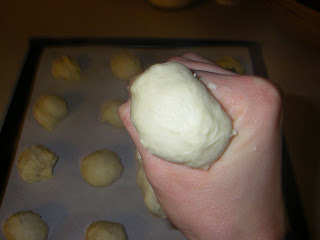
To make the Zwieback, you take a hand full of dough. 

And squeeze it between you fingers, so it makes a ball shape that you can pinch off.  You put each of these balls onto the pan and then put another ball on top.  I tried to push down the first ball a little so the second ball would set on top better. 

I have never done this before, so there was a learning curve here, but I remembered once when I was at my Great Grandma Anna's, when I was young, she did it this way. When my mom and dad got married, they received fresh baked  zwieback each week from by grandma and great grandma, so there was never a reason for my mom to make zwieback and show me how.  It does make me laugh that I remember how my great grandma squeezed off balls of dough for zwieback because she was not known for her efforts in the kitchen. We would sooner see her working on the farm, but that's a whole other story.

A pan full of zwieback before they rose. 

After they rose for almost another hour. I made a little dent in the top of the zwieback with my finger. I'm not sure why we do that, but that is what is done. 

It is amazing how good the house smells when these are baking. The smell reminded me of my grandmas house, so I knew I was on the right track. 
Not all of my zwieback turned out perfectly, but they did taste good.  On the picture above, the left is not how zwiebuck is suppose to look and the right is how it should look. 

From the side view. The left is bad and the right is good. 

Some background information on Zwieback
There are several ways to say Zwieback. I pronounce it as Tway-buck.  Some people say Zwee-bock.  It was very common for women to make Zwieback every week, so they had it on hand for breakfast and other meals.  One such meal is Faspa. According to the Homemaker's Club Cookbook: 
Faspa (Lunch) 
"Faspa" is a lunch served in the afternoon around 3:30 p.m. or later. "Faspa" is almost a must on Sunday afternoons.  It is taken for granted that when you go visiting on Sunday afternoon, invited or not, that you will be served "faspa" by your hostess.  Almost everyone is prepared to serve such a lunch, too. 
The main item on the menu, of course, is zwieback, though at times bread is substituted.  Jelly, coffee, cheese, lumps of sugar, cake, cookies or other sweets complete the meal. 

Sometimes a large group of individuals happen to visit at the same place on the same Sunday afternoon.  This can put the hostess into quite some anxiety, wondering if her food supply will be adequate.  Perhaps she can slip out the back door and borrow a few zwieback from the neighbors.  If that isn't possible, crackers often have to suffice. 

Since this cookbook was published in 1951, a lot has changed.  I would guess that faspa isn't as common as it use to be, and if you were to have unexpected guests, you neighbor would probably not have spare zwieback, if you were to slip out the back door.  However, part of me thinks it would nice if we still took time slow enough to enjoy faspa on a Sunday afternoon with friend and family, but I can't say that my house is kept clean enough for unexpected guests like that either. 

Thursday, March 11, 2010

Bucket List

I decided to do another bucket list this year. Luckily I'm starting this list much earlier, so I should be able to accomplish all 25 items before I turn 26 on December 1.

1. Make Zwieback
2. Master ham gravy
3. Make Homemade Jelly
4. Find and Make a good BBQ Sauce recipe
5. Bid at an Auction
6. Remodel the basement bedroom
7. Finish remodeling the sun room
8. Finish my senior year of college scrapbook
9. Try digital scrapbooking
1o. Learn how to cross words out on blogger
11. Eat only homemade food for one week
12. Visit friends
13. Vacation
14. Learn to do something new
15. Make apple priescha (round 2)
16. Donate something
17. Sort/Donate clothes
18. Photograph Harvest (Since I didn't last year)
19. Try a new craft project
20. Sew Something
21. Have a picnic
22. Change some light in our house
23. Lay brick around the house
24. Read the New Testament
25. Read a new book

Monday, March 8, 2010

Mennonite Monday - Lemon Bars

Mennonite Monday started because I wanted to make recipes from the Bethesda Mennonite Church Cookbooks (both the yellow and the white cookbook for those of you who own them). I also wanted to take pictures of each recipe that I made, so I would know for future reference what the recipe should look like. I am by no means a great cook, but I think it will be fun to try new and different recipes each week. Not all of these recipes are for ethnic Mennonite food, but the women from Henderson know how to cook, so I can safely say that these recipes will be good. Check back each Monday for a new recipe and feel free to leave a comment if you have a favorite recipe from these cookbooks, or if you have some tips on what I should make and how I should make it.
~

I did not get the Mennonite Monday poll posted last week, so I had to decide what I would make this week. On Tuesday night I was at the Preschool Committee meeting at our church, when we started talking about the possibility of creating a cookbook as a fundraiser for the preschool. We know that both of the church cookbooks are out of print, so we are interested in creating a new cookbook with recipes from the white and yellow church cookbook, plus some new recipes of our own.
Please leave a comment if you think a new cookbook would be a good idea and/or you would be interested in purchasing one. I'm curious to see if there is interest in this project.

Okay, so back to the recipe. As we were talking about the white and yellow cookbooks, we decided that it was kind of like this secret code that we talk in and is hard to understand unless you own the cookbooks. In this conversation, Arlyce Erb's Lemon Bars came up, so I searched through my cookbooks and found the recipe on page 21 of the yellow cookbook.

Let me tell you, this recipe is AMAZING. They are also incredibly easy for being made from scratch. I have tried to make a few recipes of lemon bars since we have been married. One from a box and at least one I found on the internet. I will never need to find another recipe for lemon bars again.

Lemon Bars
1 3/4 cup flour
1 cup oleo
1/2 cup powdered sugar
4 eggs beaten
2 cups sugar
4 tablespoons flour
6 tablespoons lemon juice

Mix flour, oleo and powdered sugar. Put in 9 x13 pan. Bake at 350 degrees for 20 minutes. Then mix together eggs, sugar, flour and lemon juice. Pour over hot baked crust. Bake at 350 degrees for 25 minutes. Cool and cut. Sprinkle with powdered sugar.

The mixture is pretty crumbly after it is all mixed up.

I did not press down the the crust in the bottom of the pan, but others I have talked to always press down the crust in the pan, so it is up to you.

I mixed the bar ingredients together while the crust was baking in the oven.

As soon as the crust came out of the oven, I poured the lemon mix on top.

In the oven.

After it was done baking.

With the powdered sugar on top.


The final project. YUM! I couldn't leave these alone. I even started eating them while they were still warm.

Wednesday, March 3, 2010

Trucking

On Monday morning Mike and I embarked on our first corn hauling experience in a semi.
Mike recently purchased this semi and trailer and this was his first trip to the ethanol plant and I was lucky enough to go along for the ride.

This is big blue.

We are pretty excited about the Bergen Farms decals, which were custom made by Marshalls Refinishing in Harvard.

I was decked out for the trip with my John Deere coat.

Pulling out of the yard.

The Hastings Ethanol Plant.

It is very interesting to see how an ethanol plant works. While I only saw one part of the process, this is what I learned. Trucks bring in corn, dump it in the elevator, they convert the corn into ethanol, they truck the ethanol out of the plant and truck the wet distillers (one of the ethanol by products) to local feedlots.

That is a truck taking the wet distillers from the plant. See how the trailer is different?

Yes I was the crazy wife who took pictures of her husbands first trip to the ethanol plant.


This is the bill of lading, which Mike took into the office before his truck was weighed and sampled to test the moisture of the corn.

There is he going into the building to deliver the bill of lading. You dump the corn in that building.

Yes I was the crazy wife that got out of the semi to take a picture of him dumping the corn and then I realized that I had forgot my memory card at home and the internal memory on my camera was full, so the pictures end here.